Search This Blog

Wednesday, January 15, 2020

HelloWorld.cpp

In my last post I showed how I do basic project configuration.  It's time to do the standard "Hello World" and make sure things work.

Recall that in that post we created an empty "HelloWorld" project.

Empty HelloWorld Project
In the view above, you see what I call a "filter view".  This does not actually represent our files on disk but, rather, the types of files you have (source, headers, etc).  If we started adding source and header files now these would be dropped in among the various other files that Visual Studio uses to manage the entire solution.  That wouldn't be ideal at all for large projects so I want to set up folders that will contain my source and include files.  To do this I switch from the default filter view to the files view.  If you click that icon that looks like a stack of papers you'll switch to file view.

Stack of papers
Notice that the file view is empty.  We need to create two folders.  We might need more, but these two will allow us to start simple.  Right click the project "HelloWorld" and Add a New Folder named "src".  Repeat this for "include".


If you look in Windows Explorer and find your project, you'll see the new folders.  Inside each we will place any needed source or header files.  Neat and tidy.


Right click the "src" folder and Add a New Item.  Select C++ and click Add.  I kept the default "Source.cpp" filename since this is just a simple Hello World test.  Also note that the source file location is set to our "src" folder.


In our new C++ file we can enter the ubiquitous Hello World code!

 #include <iostream> 
int main(int argc, char* argv[]) 
{
std::cout << "Hello world!" << std::endl;
return 0;
}

(Blogger doesn't have a codeblock tool so that looks pretty ugly.)

Hit F5 (to run with debugging) or Cntl-F5 (to run without debugging).

The program will compile and link.  Output will be in the proper output directory.  All intermediate files will be in the Intermediate Directory.  Neat and clean.

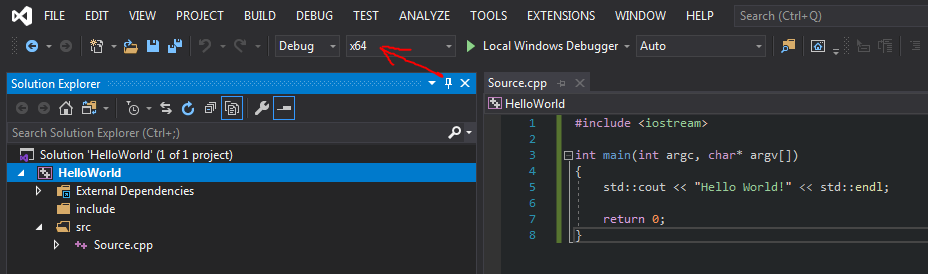
If you get goofy errors, be sure to check that your platform settings are appropriate.  My empty projects seem to always start with the x86 platform by default.  Every so often I'll get an error (usually during linking) and realize that I forgot to set the platform.  This sort of thing would be rather loud if we were linking an x64 program against x86 libraries

Below you'll see that compile and link was successful and that we can run HelloWorld.exe successfully.


This is just a simple Hello World but I hope this is helpful to anyone just getting their feet wet with Visual Studio.  As always, I welcome constructive criticism.  It helps me learn and get better at this stuff.

Basic Project Configuration in Visual Studio 2019

As you might recall from a blog post a year or two ago, I like to ensure my projects in Visual Studio are set up in what I consider suitable and sensible ways.  I learned this from Yan Chernikov, a game programmer with EA, who runs a very well produced YouTube programming channel.

In this post I'm going to walk through the basic project configuration settings I set for all my projects.

First, you'll need to have a blank project created.

Create a new project

Create an empty C++ project

Name the project

A brave new world

Now, select the project name and click the "wrench" to get the project properties.


Under the General section of the Configuration Properties, set the following values:

  • Output Directory: $(SolutionDir)bin\$(Platform)\$(Configuration)\
  • Intermediate Directory: $(SolutionDir)bin\intermediates\$(Platform)\$(Configuration)\

Set directories
Hit Apply and then OK.  That's it!  Of course there are plenty of other things that we can configure, but these basic steps will ensure that any project we create will be stored and filed sensibly for any Configuration or Platform.

In future blog posts I'll cover how to set up SDL and other external libraries and even write some simple "Hello World" test programs.  Exciting, I know.  Stay tuned.

Upgrading VS2019

A couple of days after installing Visual Studio 2019, I was met with a pop up that indicated an available update was ready to install.


I clicked on that pop-up and was presented with the summary of what was being done.


I clicked on the Update button and watched as the patch was downloaded, extracted and then applied.  VS2019 was running in the background and, as noted in the summary, it closed automatically at some point.  No fuss or need for me to intervene.

Once the update was finished, Visual Studio reopened on its own.  Easy.

The upgrade was quick and painless.

Moving to Visual Studio 2019

I made the leap and downloaded Visual Studio 2019.  Installation was painless which is what I come to expect from Windows software installers these days.  I'll be making new posts related to VS2019 but posts about the older versions will remain for anyone who might need them.

Usual disclaimer: I am not a professional programmer.  What I do with my IDE is, in all likelyhood, not something big programming shops would do.  I try my best to incorporate good workflow but please don't flame me if I'm doing things against the grain.

I suppose that it's worth mentioning as well that my code is not "clean" and not C++14 (or even C++11).  I do dumb things and ask dumb questions.  But I've been happy with the results of many test programs, proofs of concepts, and so-called "tech demos" that I've written over the years.

One of the dumb things that I did was uninstalling VS2017 and VS2013 from my system.  I knew that a VS project could be converted automatically for use in newer versions of Visual Studio.  What I hadn't consider is that if there was a problem with the conversion process.

Luckily most of the affected projects were of the simple "Hello World" type.  A program to test function pointers, another to test some OpenGL stuff and one for SDL.  I had many of what I call my "WTF" programs where I was trying to sort out one thing or another.  Basically these were all throwaways and I did just that.

My biggest worry was having the project files for my game get destroyed.  This "game" is hardly finished and nowhere near the point that I can even claim it to be a game at all.  But I worked months on that thing, pouring over pages of notes for SDL while I attempted to get a dwarf to move sensibly in a grid-based game world.

It was safe and I breathed a sigh of relief.  My next posts will cover the most basic of basics in Visual Studio 2019 - updating it and getting Hello World working.

Friday, August 31, 2018

In-App Purchases

At one point, games on mobile devices were fun.  Addictive even.  Today, they are still addictive - depending on the game.  But my patience with the overuse of in-app purchases (IAP) has worn away.  If a game wishes to inundate me with ads and pleas for cash then I delete them.  Even if it's a game that I once loved to play.  I've no time for the nonsense anymore.

I absolutely support a developer's right to ask for payment for their work.  Free apps that have an IAP for purchasing the "full version" or to remove banner ads are alright by me.  But if your game is downright impossible to play without "boosts" and those "boosts" are also available as "permanent boosts" and you flood me under with downright pushy ads then go away.

And if selling my virtual farm goods to virtual vendors in the game subjects me to an ad that I'm required to watch for me to claim the coins I worked (virtually) to earn then I'm deleting your game.

Look, I'm an indie game developer.  I love to write games and I've got a long list of game ideas and works-in-progress.  I develop my games in Unity, Roblox, or just roll my own games using SDL and C++.  I understand that making games is work and that we enjoy getting some sort of payment for that work.  For me, I really like hearing from people who play my games and say, "That was a fun game!"  I appreciate the folks who send me a dollar here and a few more dollars there.  But I absolutely refuse to subject my players to pay walls or pay-2-win or cash grabbing tricks designed to suck money out of them.

Enough is enough!  Make games.  Make fun games.  Ask people to pay for them and even offer some incentive boosts for purchase.  But don't take your audience for granted.

You'll lose the confidence of the gamers you're trying to keep playing your games.

Sunday, March 18, 2018

The Programmer's Dilemma

It's been a long while since I did any coding in the Linux kernel.  I was never a contributor to the kernel.  I never pushed any patches.  I did, however, enjoy the simple changes I made to the code that I ran on my sandbox server.  This was way back around the 0.99 days.  These journeys into the Linux kernel were brought on mostly for "academic exercise" while brute-forcing through my operating systems class in college many years ago.  I was successful at building that kernel.  It loaded with the simple boot loader that I wrote in assembly language and C.  I put a notch on my keyboard and checked off two items on my nerdy bucket list.  I never got more involved in kernel programming beyond these initial steps.

As you might know from previous posts, I am not a professional programmer any longer.  That was many many years ago.  When I switched from programming to systems administration I found that, over the years, my programming skills began to fade.  At one point I was rather good at C and was growing more functionally competent with C++.  Occasionally I would sit back and wish that I had stayed with programming.

When I started getting back into programming I found that, although going back to basics wasn't entirely necessary, I needed a refresher in how certain things worked.  Pointers had become rusty and function references were now as foreign to me as the surface of Mars.  I took to task going over each and every page of the C++ Reference which served as an excellent catch up tool.

I then jumped head first into the waters of game engine design.  And drowned almost immediately.

I had forgotten Rule 1 of learning programming.  Stay in the shallows until you learn to swim.

As much as I wanted to write my pet project game engine I realized that I absolutely had to start smaller.  The years away from formal programming had taken their toll and I was no longer able to "think like a programmer".

Friday, March 2, 2018

Troubleshooting Gnomoria

As you might have read from my earlier post about my favorite games, I have a fondness for Dwarf FortressGnomoria (available on Steam) is a game about gnomes who, much like the dwarves, start out with a cart and some dreams.  Gnomoria takes the Dwarf Fortress idea and simplifies it (greatly) and leaves us with a more managable "city" builder game.

Our intrepid dwarves gnomes take to task building farms, harvesting wood, and digging holes in the ground (across multiple z-levels).  Unlike DF, G comes with some rather nice graphics.  Personally I like the ASCII of DF though I also run with the Phoebus tileset, but that's a story for another time.

Anyway, I have played Gnomoria on occasion for several hours a go.

One day I did some cleaning up of my system.  I got rid of everything that was old and stale.

And when I reinstalled Gnomoria recently I found that it wouldn't start.  It launched and crashed almost immediately.  No logs, no dialog box, no anything that might give some clue as to what was going on.  Even the Internet was quiet about this.  Not surprising since Gnomoria has now gone to version 1.0 and no longer supported.  Or, rather, that's what it seems.

I was determined to fix this issue.  Since I knew I had just cleaned up a lot of old junk, perhaps that had something to do with it.  So I dusted off my old hat from my days as a tech support desk jockey and dove headfirst into the problem.

First things first.  I looked at the Gnomoria directory in the Steam install path.  No logs.  Nothing really except the game files.  Everything looked to be in order.

And then I saw it.  A folder named "XNA".  Wait a minute.  Was this game written (at least in part) using the now defunct Microsoft XNA Game Studio?  There in the folder was the .msi file to install the XNA redistributable.

These redistributables are essentially library files that contain the shared data that were used to create the game.  You see, a programmer can set their program to link as a static or dynamic executable.  Since static builds are generally larger than dynamically linked, we oftentimes will build our projects as dynamic.  Doing so leaves us a smaller distributable archive and requires the end user (the gamer) to already have (or willing to download) the dynamic libraries that we used during build time.

For convenience, Gnomoria included the installer for the XNA libraries.

I already had the latest XNA redistributable installed from my days of tinkering with XNA Game Studio.  During my cleanup, I removed it since I no longer was testing the XNA waters (and also since Microsoft killed it).

So I grabbed the latest XNA redist from Microsoft, installed, and Gnomoria is running once again.